IDS with MikroTik and Snort
UPDATE: For more flexible streaming, and for not having to hack your Snort init scripts, you might want to consider this article as well. Now back to the scheduled program.
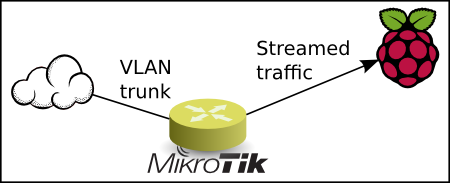
Port mirroring on a strategically positioned switch can be the best setup for an IDS sensor. If that’s not an option, RouterOS-based MikroTik devices support capturing network traffic, streaming it to a remote target using the TZSP protocol. This functionality is available in RouterOS and extended support is provided by the calea package.
Configuring a remote IDS device with MikroTik has been described elsewhere, for instance here and here, but since my plan involved an ARM based Raspberry Pi, MikroTik’s trafr mentioned in those articles could not be used since it’s for x86 only and the source code does not seem to be available. Luckily I found tzsp2pcap which converts the TZSP stream from the MikroTik device into a pcap stream readable by Snort.
My setup
The setup used for this project consists of an RB2011UAS-RM (model is now EOL, replaced by RB2011UiAS-RM) acting as NAT firewall/router, and a Raspberry Pi B+ unit on which I installed Raspbian. The firewall connects to my ISP over a dedicated VLAN, so the outside interface with an official IP address is a bridge VLAN interface named bridge-vlan02-untagged. This will also be the capturing interface.
Note that the traffic capture takes place after NAT, so with this setup Snort will see traffic initiated from the inside as having the official IP address. In other words, you will not see the origin IP address of any suspicious outbound activity.
Compiling tzsp2pcap
Building tzsp2pcap requires the packages git, build-essential and libpcap0.8-dev. Now git clone or download the tzsp2pcap source code. To make tzsp2pcap compile on Raspbian I also had to modify the Makefile somewhat, from
cc -std=c99 -o $@ $(CFLAGS) $(LDFLAGS) -lpcap $<
to
cc -std=gnu99 -o $@ $(CFLAGS) $(LDFLAGS) -lpcap $<
After this modification, compile the code:
$ make
cc -std=gnu99 -o tzsp2pcap -Wall -Wextra -pedantic -O2 -lpcap tzsp2pcap.c
tzsp2pcap.c: In function ‘main’:
tzsp2pcap.c:355:12: warning: format ‘%lx’ expects argument of type ‘long unsigned int’, but argument 3 has type ‘int’ [-Wformat]
tzsp2pcap.c:355:12: warning: format ‘%lx’ expects argument of type ‘long unsigned int’, but argument 4 has type ‘int’ [-Wformat]
You should end up with a binary file named tzsp2pcap. Move it to /usr/local/sbin/ or similar.
IPv6 requirement
Note that tzsp2pcap seems to have been programmed to require IPv6 support even if IPv6 is not necessarily in use. If you get this message:
# tzsp2pcap
socket(): Address family not supported by protocol
Could not setup tzsp listener
…you’ll need to modprobe ipv6 or otherwise enable IPv6.
Verifying the capture
Now it’s time to test the reception of the traffic capture stream. First, start the tzsp2pcap listener, piping the result into tcpdump for making sense of it:
# tzsp2pcap -f | tcpdump -n -q -c 10 -r -
Then start the traffic capture on the MikroTik device. The IP address 10.20.30.40 is where you run tzsp2pcap.
/tool sniffer
set file-limit=0KiB filter-interface=bridge-vlan02-untagged memory-limit=0KiB streaming-enabled=yes streaming-server=10.20.30.40
In your tcpdump session, you should now see something like this:
IP [ip].49386 > 195.159.90.90.6697: tcp 51
IP 195.159.90.90.6697 > [ip].49386: tcp 85
IP [ip].49386 > 195.159.90.90.6697: tcp 0
IP [ip].4100 > 89.10.10.20.5060: UDP, length 419
IP 89.10.10.20.5060 > [ip].4100: UDP, length 547
IP 148.122.7.125 > 224.0.0.1: igmp
[...]
When started as shown above, tcpdump will stop by itself after having received 10 packets. If you see something similar to this, that means that both your MikroTik device and your tzsp2pcap listener are working correctly and you should give yourself a pat on the back!
Installing and testing Snort
Installing Snort is the easiest part: aptitude install snort. After answering the questions during the installation, allow Snort to start. Find out how the process is run:
# ps -ef | grep snort
You should see something like this:
snort 5628 1 1 12:22 ? 00:00:00 /usr/sbin/snort -m 027 -D -d -l /var/log/snort -u snort -g snort -c /etc/snort/snort.conf -S HOME_NET=[10.20.30.0/24] -i eth0
The above is required since we will not be running Snort in a normal fashion. Now stop Snort, and make sure it doesn’t start by itself at boot:
# update-rc.d -f snort remove
Based on the above findings and your own preferences, including what’s defined in snort.conf and any related config files, you should now be ready to forward the stream from the listener and into Snort. Note the ‘-r -‘ at the end, that’s what makes Snort analyze traffic received on STDIN.
# tzsp2pcap -f | snort -m 027 -d -u snort -g snort \
-c /etc/snort/snort.conf -r -
If everything runs as it should, you should start seeing some alerts trickling in. The default log file seems to be /var/log/snort/alert which is nice for debugging and testing. For those somewhat serious about running an IDS, storing alerts to a database will be the better approach.
Some sample output from /var/log/snort/alert:
[**] [1:553:7] POLICY FTP anonymous login attempt [**]
[Classification: Misc activity] [Priority: 3]
03/14-15:11:12.287084 [ip]:43920 -> [ip]:21
TCP TTL:63 TOS:0x0 ID:0 IpLen:40 DgmLen:88
***AP*** Seq: 0xD87294F5  Ack: 0x7105DEA6  Win: 0xDA  TcpLen: 32
TCP Options (3) => NOP NOP TS: 313122335 3732452130

[**] [1:1321:8] BAD-TRAFFIC 0 ttl [**]
[Classification: Misc activity] [Priority: 3]
03/14-15:54:18.504939 [ip] -> [ip]
IPV6-FRAG TTL:119 TOS:0x0 ID:625848831 IpLen:40 DgmLen:1096
Frag Offset: 0x016A   Frag Size: 0x0420
[Xref => http://www.isi.edu/in-notes/rfc1122.txt]

[**] [1:1417:9] SNMP request udp [**]
[Classification: Attempted Information Leak] [Priority: 2]
03/14-16:08:20.293852 93.180.5.26:33306 -> [ip]:161
UDP TTL:245 TOS:0x0 ID:54321 IpLen:20 DgmLen:61
Len: 33
[Xref => http://cve.mitre.org/cgi-bin/cvename.cgi?name=2002-0013]
[Xref => http://cve.mitre.org/cgi-bin/cvename.cgi?name=2002-0012]
[Xref => http://www.securityfocus.com/bid/4132]
[Xref => http://www.securityfocus.com/bid/4089]
[Xref => http://www.securityfocus.com/bid/4088]

[**] [1:469:3] ICMP PING NMAP [**]
[Classification: Attempted Information Leak] [Priority: 2]
03/14-16:52:10.022351 [ip] -> [ip]
ICMP TTL:37 TOS:0x0 ID:64264 IpLen:20 DgmLen:28
Type:8  Code:0  ID:46546   Seq:0  ECHO
[Xref => http://www.whitehats.com/info/IDS162]

[**] [1:524:8] BAD-TRAFFIC tcp port 0 traffic [**]
[Classification: Misc activity] [Priority: 3]
03/14-17:15:57.591933 113.108.21.16:12209 -> [ip]:0
TCP TTL:50 TOS:0x0 ID:0 IpLen:20 DgmLen:40 DF
******S* Seq: 0x6F024630  Ack: 0x0  Win: 0x2000  TcpLen: 20
Maintaining and tuning Snort
Configuring, maintaining and tuning Snort further is a (large) job in itself, and should be customized according to your own requirements. See the excellent Snort documentation for more on this topic.
System loads
With a network usage at around 7-8 Mb/s, the RB2011 uses about 40-45% CPU with traffic capture enabled, as opposed to 10-15% without traffic capture.
The Raspberry Pi B+ running Snort uses almost no CPU in regular use, but about 90-100% CPU with a load average between 1 and 2 analyzing the network traffic during the download. For this purpose a Raspberry Pi 2 would probably be better suited.
UPDATE: A new test with other hardware shows the following loads:
With 7-8 Mb/s throughput, an RB450G performs at about the same load as the RB2011. Replacing the Snort sensor with a Raspberry Pi 2 shows quite an improvement: Where the regular RPi B+ spent all its CPU resources on traffic analysis (load values between 1 and 3), the RPi2 has a load of 10-15% (load values between 0.10 and 0.15).