Mobile entertainment center
Our three kids very seldom agree which TV program or movie to watch. Allowing for less discussion when screen time is granted, I’ve set up a mobile entertainment center where each kid may watch the movie of their choice – this may be used during long drives, on trains or buses, and everywhere else where there’s low or no voltage and a need to grant the kids some screen time.
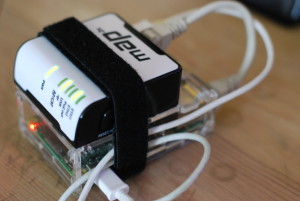
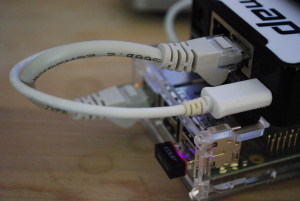
The setup is simple, using a Raspberry Pi B+ running Raspbian and a Mikrotik mAP2n. The RPi is directly connected to the mAP2n with an Ethernet cable. Both are/can be powered by microUSB voltage and cable. The RPi is also equipped with a USB WiFi adapter, configured as a WiFi client, so when the unit is within range of the wireless network at home I can update it and transfer media files to it.

The two units tied together with velcro. When finalizing the project I will need to find a better case.
Packages installed on the RPi
After having slimmed down the RPi by removing any package not needed, I installed minidlna. While the minidlna project was recently renamed to ReadyMedia, in Debian/Raspbian it still goes by its former name. To administer the mAP2n from the RPi I also installed mactelnet, and to make sure both units logged with useful timestamps I added an ntp server. Finally, it seems the mAP2n does not support running a DHCP server, so I left that to the RPi (isc-dhcp-server). The DHCP server listens only on eth0, to which the mAP2n is connected.
Configuring the tablets
On each kid’s tablet, I installed a DLNA controller (I chose the Ginkgo DLNA player, but I assume any kind of DLNA/UPnP controller will do). Note that the Ginkgo DLNA player is simply streaming from the media center to the device, but not rendering the content – you will need something else for that. I’m very fond of VLC for Android and it works excellent in this use case.
Setting up the mAP2n
Configuring the mAP2n as an AP/bridge, a separate SSID was configured. The mAP2n synchronizes its clock to the RPi. The interfaces wlan1 and ether2 are bridged, and the bridge holds the unit’s IP address.
TL;DR
In essence:
- Install Raspbian on a Raspberry Pi.
- Install minidlna and isc-dhcp-server.
- Configure wlan0, supplying SSID and credentials, for being a WiFi client.
- Make sure you can SSH to the RPi over the wlan0 interface. When successful, configure static IP on eth0.
- Connect ether2 on mAP2n to eth0 on the RPi.
- Configure the mAP2n as an AP/bridge. Set up SSID and credentials for the AP.
- Set up the tablets for DNLA streaming.

Note the USB WiFi adapter, providing wireless update of the RPi unit when within range of the home network.
Configuration snippets
Configuration for RPi network /etc/network/interfaces:
auto lo
iface lo inet loopback
auto wlan0
iface wlan0 inet dhcp
    wpa-ssid YourSSID
    wpa-psk SomeSecretPassword
auto eth0
iface eth0 inet static
    address 10.1.0.1
    netmask 255.255.255.0
    network 10.1.0.0
DHCP server configuration file /etc/dhcp/dhcpd.conf:
ddns-update-style none;
default-lease-time 600;
max-lease-time 7200;
authoritative;
subnet 10.1.0.0 netmask 255.255.255.0 {
    range 10.1.0.100 10.1.0.200;
}
DHCP server configuration file /etc/default/isc-dhcp-server:
INTERFACES="eth0"
Minidlna configuration file /etc/minidlna/minidlna.conf:
# These are all defaults
media_dir=/var/lib/minidlna
port=8200
serial=12345678
model_number=1
mAP2n configuration (sensitive data removed):
[admin@YourAP] > /export
/interface bridge
add name=bridge
/interface wireless security-profiles
set [ find default=yes ] authentication-types=wpa2-psk \
    mode=dynamic-keys supplicant-identity=MikroTik \
    wpa2-pre-shared-key=SecretPassword
add authentication-types=wpa2-psk mode=dynamic-keys \
    name=YourAP supplicant-identity=YourAP \
    wpa-pre-shared-key=SecretPassword \
    wpa2-pre-shared-key=SecretPassword
/interface wireless
set [ find default-name=wlan1 ] band=2ghz-b/g/n \
    country=norway disabled=no frequency=auto \
    l2mtu=1600 mode=ap-bridge security-profile=YourAP \
    wireless-protocol=802.11
/interface bridge port
add bridge=bridge interface=ether2
add bridge=bridge interface=wlan1
/ip address
add address=10.1.0.2/24 interface=bridge network=10.1.0.0
/system clock
set time-zone-name=Europe/Oslo
/system identity
set name=YourAP
/system leds
set 3 interface=wlan1
/system ntp client
set enabled=yes primary-ntp=10.1.0.1
Performance
Throughput with three concurrent players showing .mkv movies (720×576 px, 25fps, H264 MPEG-4 AVC, MPEG AAC) sometimes peaks at around 22 Mb/s, and the RPi doesn’t break a sweat when serving at that speed. Obviously different formats would affect the RPi load and WiFi throughput.
Attaching a 4 x AA portable battery pack as shown below, the two units (mAP2n USB powered from the RPi) were running for more than three and a half hour, and during this period they streamed movies to one tablet for two and a half hour.

Exibel battery pack bought from Clas Ohlson.
And for those who might ask: Yes, a Raspberry Pi could simply be equipped with two WiFi adapters, one for client access and for for AP. There are lots of different approaches to this. In my case, I had a spare mAP2n just lying there…